Time Tracking with Busy Bar
Customizing hardware for automated time accounting.
I have always loved the idea of time tracking. Understanding where each minute goes to allow me to optimize each day has long been appealing to me. But I have always hated the practice of time tracking, which quickly became very monotonous, in addition to error-prone. Somehow I came across the soon-to-be-released Busy Bar, which on the surface seemed unremarkable. Truthfully, the applications shown in the demos seemed a contrived. Yet as soon as I realized the potential of this device, which cleverly combined a unique screen, physical button interfaces, and open source firmware, I believed that I could transform it into the time tracking tool of my dreams.
I could not get the device (or more correctly, the imagined future state of the device) out of my mind, so I excitedly pre-ordered the bar in hopes that I would be able to land somewhere close to what I had envisioned. My goal was to create a physical device that would automate all of the boring accouting work out of time tracking and rely on precise timestamps rather than fuzzy recollections to perform this accurately. Now, there are lots of different Pomodoro timers that exist already, but I have never found one that quite matches my ideal. First, I think Pomodoro is a useful method, particularly for tasks that fail to inspire motivation, but I do not believe it is optimal for all tasks. Second, I find that the standard Pomodoro timer is too rigid in that it happily interrupts your flow state to force you to take a break, independent of your willingness to take that break precisely when the timer completes. Third, Pomodoro is more of a strategy for breaking down an unstructured day rather than helping to ascribe time that may be shared across multiple activities, so it still needs an accounting layer on top.
Enter my ideal timer, which addresses each of these pain points. First, it supports tasks that can be performed via the standard Pomodoro split or can be unbounded. Second, time for a given activity is recorded until you manually stop the timer and begin your break period. Additionally, it sounds an alarm when the break is finished but does not make any noise to disturb a work session once the minimum time has been reached. And third, I can easily select the current activity associated with a given timer. Then at the end of the day, I can understand how time was distributed across my fixed set of activities down to the second.
Eventually, the busy bar was open for pre-orders, and after even more waiting, it finally showed up at my doorstep. I was immediately impressed with the build quality and started working with Claude to understand the device that I had purchased. At the time, the documentation was pretty minimal, since very few units were actually in use. I was able to rapidly get a simple probe script built that would help to answer many of the necessary questions to begin making firmware changes that were not answered by the existing documentation. I soon had obtained enough information about the communication protocols supported by the bar that I could begin to draft the implementation for my activity time tracker.
In no time, I was slinging AI-generated firmware onto the bar with impunity, which would have been an unimaginable decision even just a year ago. I had never done any substantial work with embedded systems or firmware. Once upon a time I used C pretty heavily for HPC applications, so I knew a bit of what I was looking at, but I certainly would not have been able to catch any subtle issues in the AI-written diffs. However, through a combination of starting out with a well-written repo as well as the sheer capability of Opus 4.8, I was able to start tweaking firmware, flashing it to the bar, and then iterating. I only bricked the bar once during these adventures, and the root cause was due to a fairly subtle requirement in the handshake protocol between the main U5 chip and the wireless Si917. I certainly would have stubbed my toes way more times, so I cannot blame Claude for initially failing to pick up on this seemingly minor detail. After adding a skill for flashing firmware, I never hit this issue again. Also, I was forced to learn how to recover the device and restore both chips to the stock bundle, which only emboldened my exploration.
Firmware Implementation
I forked the existing firmware and started tweaking it to support my ideal activity tracking paradigm. In general, I had two classes of commits: changes expressing my hardware preferences and changes required for my activity time tracker. I was careful while making changes to avoid touching anything related to the bootloader, networking, or transport. This guaranteed that the bar would always be USB recoverable even if I flashed bad changes. While playing with the bar connected to my computer over USB and listening to the events streamed over the virtual LAN, I learned enough about how events were broadcast from the device to start shaping the structure of my activity selection.
Adding Custom Activities
I learned that the bar publishes a snapshot whenever a timer changes state, so we could open the event stream and listen to snapshots to understand what is happening on the bar. I made some changes to the firmware so that each snapshot would include additional metadata so that we could understand which activity was associated with a given timer. After defining the class for my activities and wiring these throughout the existing logic, we had a simple system where the user would select among a fixed list of activities baked into the firmware. Each activity was customizable through a very simple JSON snippet, so that most activity-specific changes would not require source code changes. As an example, here is the specification for my “development” activity:
{
  "sort_order": 40,
  "title": "Development",
  "icon": "ide_green",
  "id": "b1a70000-0000-4000-8000-000000000004",
  "profile_timestamp_ms": 0,
  "timer_settings": {
    "type": "INTERVAL",
    "interval_work_ms": 1500000,
    "interval_rest_ms": 300000,
    "interval_work_cycles_count": 2,
    "is_autostart_enabled": false
  },
  "busy_bar_settings": {
    "theme": "coding_green",
    "show_work_phase_only": false,
    "trigger_smart_home": false
  }
}
Many of these attributes are self-evident, but a few of them may require a bit of an explanation. We are setting up development to occur on a Pomodoro timer with durations of 25/5/25 for work/break/work. Additionally, I wired in support for custom animations and icons for each activity. These were certainly not required, but they did improve the user experience of selecting an activity. Additionally, I appreciated that I could identify the current activity from the animation, since I generated a custom animation for each.
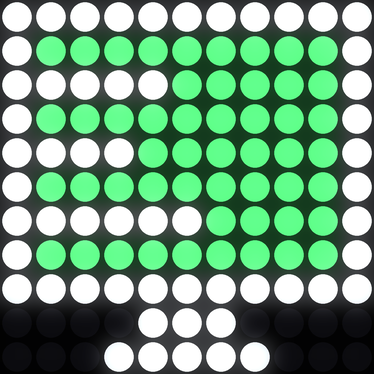
I glossed over lots of low level details on exactly how the firmware was changed, but I encourage the interested reader to check out my public fork, which documents all of the changes and design decisions that I made. I also published a handful of very useful Claude skills that will likely be generally useful for any firmware changes even if your ideal application has nothing to do with tracking time for specific activities.
Time Philosophy
With the plumbing in place, I could focus on translating my time philosophy into the code (or really just JSON at this point) required to realize my dream. I decided pretty early on that I did not actually wish to track every minute of each day, which would seem to encourage generally unhealthy habits. I also did not want to just create a device that guaranteed my burn out. So I decided that I would focus on measuring how much of each day was spent doing something “productive.” This, too, is fairly ambiguous and could set up the wrong incentive structure.
In the end, I landed on defining 7 distinct activities that I would track:
- Work
- Development
- Exercise
- Recreational Reading
- Technical Reading
- Chores
- Perfect Form
This list was chosen carefully to balance granularity with expressivity. If I could understand how much time I invested into each of these categories in a given week, I would have a very useful signal to monitor my time investment strategy.
One major source of ambiguity was “Work,” which often dwarfed the other activities during the week. I already have to fill out detailed time cards each week for approval, and my goal was not to improve the accuracy of my estimates in Clockify. Rather, I wanted to understand how much of each day was dedicated to work tasks. I found that this was very useful to me in two different contexts. First, it helped me push through slow days and kept me on top of my tasks so that they would not spill over into my evenings to make up for procrastination. Second, it provided guardrail to prevent me from being tempted to log back into work at night unless necessary if I knew I already had completed a full day’s work. In this way, tracking the time I was spending on work each day actually helped me to be more productive during the day and left me more time in the evenings. Also, I will point out that I chose to allocate activities such that a full day may have less than 8 hours of work. If I spent an hour at work reading a paper, for example, I would log this activity under “Technical Reading” rather than “Work.” Again, I was more interested in understanding how much I was reading each week than confirming that I was completing full work days, which I already knew to be true from my time cards.
Another very ambiguous category was “Chores,” which could occupy a small or significant fraction of a given week depending on the specific semantics. I landed on a fairly restrictive definition of “Chores,” so lots of daily tasks that were essentially requried were excluded. I found that this still gave me the visibility that I needed into time spent on non-standard activities and provided enough context to understand why one night might simply have less time available for the other activity categories.
Host Services
After flashing all of my firmware changes to the bar, I had everything running on the bar to allow me to select my activity and log the time spent on that activity down to the second. However, this information would be streamed out into the void and unpersisted without software to make sense of the events transmitted from the bar. This introduces the second stage of the project, which is responsible for recording these events, using them to reconstruct my day, and finally present this information back to me so I could see how each day was spent. Since I recently built out a homelab, I had the perfect always-on computer to run all of the required services for listening to events and displaying the resulting data.
Event Recording
The most critical component was obviously making sense of the events streamed from the bar to create usable data. This was quite straightforward after the firmware changes, since the bar would emit snapshots whenever a timer was started, paused, manually transitioned, or terminated on the /api/status/ws stream. The metadata associated with each snapshot allowed us to understand the activity associated with a given timer, and the timestamps allowed us to determine precisely how much time was spent on a given activity. The main job of the recorder, then, was to map the stream of event changes into sessions, which were scoped to a single activity and had a dedicated start time and end time. Using this session model, I adopted an append-only log structure so that each session would get dumped to disk.
Eventually I ran into a slight hiccup, which I discovered on accident when I restarted my recorder service while a session was in progress. The recorder saw the event anchoring the start of a session, but this open session was only stored in memory. As a result, when the service came back online and received the event anchored at the end of the session, it did not have the necessary information to correctly log the session information. As a result, I added checkpointing logic so that the recorder state was saved to a small JSON file for every state transition. This checkpoint ensured that the most recent transition would be usable to correctly assemble sessions even during unexpected outages.
Utilitarian UI
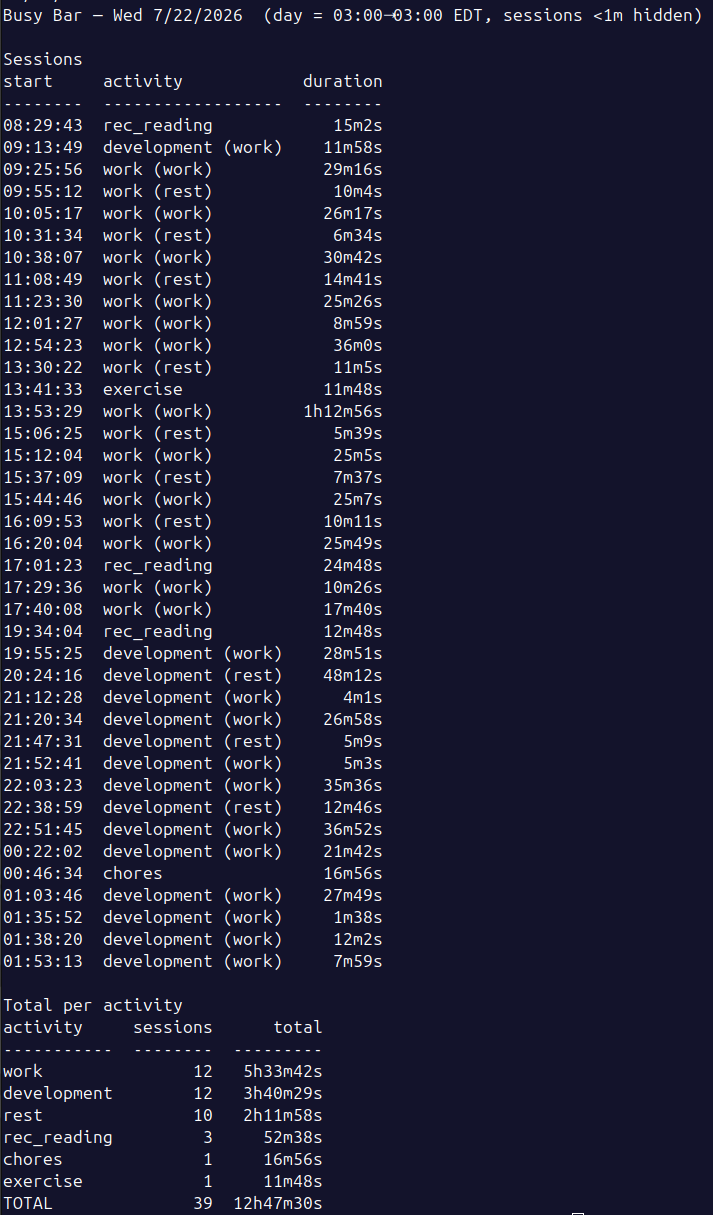
Initially, I relied on a simple CLI that would summarize all of the activities that I completed during a given day. This was very informative for me to see the individual sessions of each day as well as the aggregate statistics. Below is an example from one particularly industrious day. Yes, I am aware that I am documenting that I spent less than 8 hours working on this particular Wednesday. In my defense, I was working past midnight wrapping up a work project the night before (check the Slack messages), so I feel comfortable admitting this.
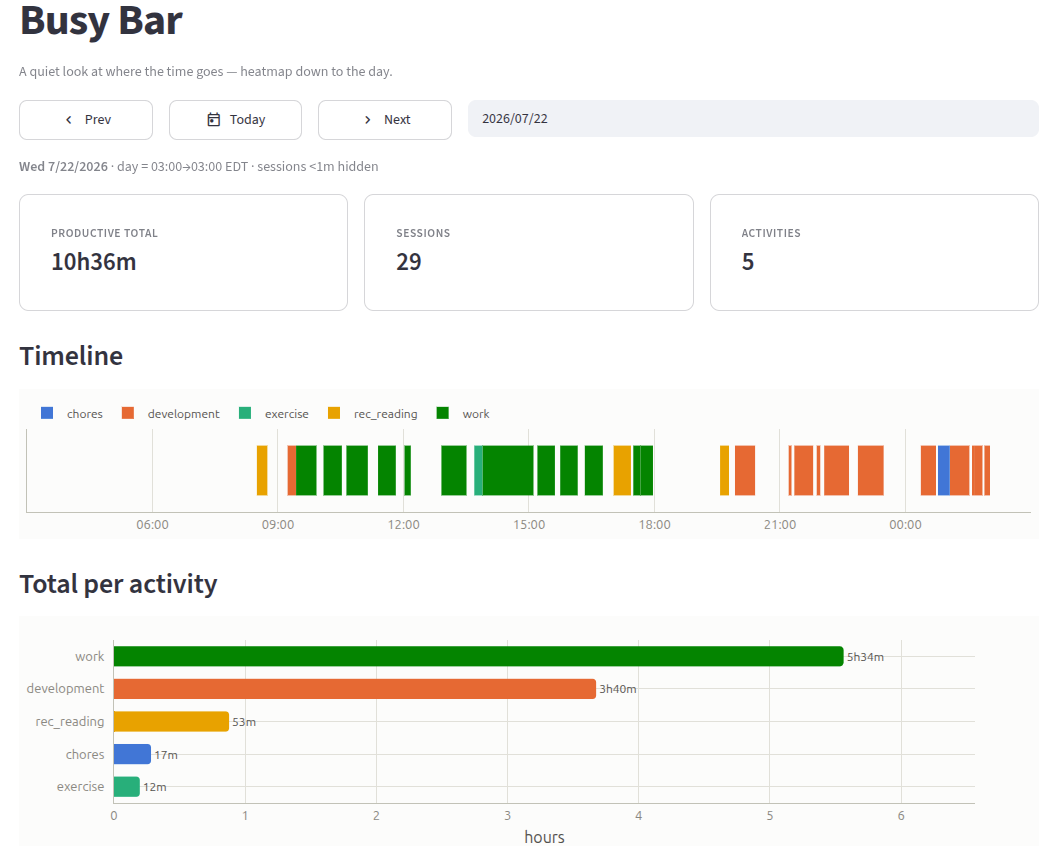
The next step in the evolution was creating a simple streamlit application that would allow me visually explore this same information, in addition to having dedicated views on the level of week, month, and year. The dashboard was designed to be interactive, so I could easily drill down to get a more detailed view of each day as needed. I have found that being able to check in to measure each ongoing day’s progress has helped me to stay on track.
Migrating to the Homelab
At this point, I had the prototype working perfectly. I could reliably select activities on the bar and use the intuitive timer controls, and my laptop connected to the bar would infer the appropriate sessions and allow me to visually explore each day. I almost decided that this should be the final stage, since I got in the habit of keeping my personal laptop in my office to listen to music anyway to keep my phone from distracting me. However, I realized that for time spent outside of working, walking back to my office to manage timers was burdensome. The device already supports communication through both WiFi and Bluetooth, so relying on a wired connection seemed like a waste of existing capability that wanted to support wireless time tracking.
Since I was moving off the USB tether anyway, I decided to also switch from HTTP to using MQTT. This would have a few advantages around power usage, more general network configurations, and delivery semantics at the cost of some additional complexity, mainly running the broker. Truthfully, though, this was more of a decision driven by curiosity than technical trade-offs. I felt like I should gain a little experience with pub/sub. So I added a simple broker to the backend, and I discovered that I needed a separate container to serve as the linker. Without going too deep into the details, I needed to spoof a vendor cloud (which was thankfully simple since there was no handshake validation) so that the timer snapshots could be published.
Now I had the real end game setup. The bar had all of my activities loaded up, each with a custom icon and animation. My homelab had a listener service that allowed for forming sessions from the bar wirelessly and had simple outage support. Additionally, moving to the homelab meant that I could view the streamlit dashboard on any of my devices while connected to my home network. I created the time tracking system of my dreams that allowed me to easily compile all fo the data that I had always wanted.
Future Improvements
There are many further improvements that I could make. The streamlit application is serviceable and suits my current nedds but certainly not elegant. In a similar vein, the AI-generated icons and animations could be much better designed and better employ gradients and patterns to create more pleasing visuals. More appealing to me, though, would be to add firmware support for persistent spooling of messages on the bar. This would allow messages that failed to deliver to be stored on the device, which would unlock using the bar while traveling when it could not be connected over my local network to the homelab. I decided to draw the line here for now for two main reasons. First, I do not travel that often, and when I do, I am rarely looking to optimize my productive time. Second, the purpose of this project was to amplify my time spent on projects rather than add yet another project to my long list.
Conclusion
The busy bar is without a doubt the coolest device that I bought this year (and I picked up a Blackwell GPU a few months ago). Despite my sky high expectations, the bar has exceeded even what I had imagined. Writing firmware that runs on such a well-designed device has been very enjoyable, as has the process of creating the software stack running on my homelab to record sessions and visualize each day. And most importantly, I have created a very powerful tool that will continue to pay dividends in helping me best use my time.