3D Pose Harness
Creating a 3D pose harness for robust estimation.
I have been playing with computer vision models for performing 3D pose estimation for 3 years now in an effort to create a useful lifting analysis platform. The platform today is miles ahead of the early prototype that I created, yet it has always felt more like a prototype than a product. If you visit Perfect Form today, you will notice that the application is entirely built out, minus a grayed out Stripe button to actually pay for the product. Quite simply, I was never convinced that the usefulness crossed the threshold required to start asking people for the money required to operate the backend.
To extract biomechanical metrics at the level accuracy required for powerlifting, we required a solution that would be both very precise and robust. When Meta released their SAM3 models, we immediately benefited from a step function in the precision of the estimated 3D geometry of keypoints. However, we still lacked the robustness needed for usable form analysis. It struck me that I needed to start tackling the issues inherent to the entire approach rather than wait for the next generation of models and hope that they would solve all of our problems.
To this effect, I started development of a general purpose harness that would improve the performance of any computer vision models for pose estimation. In this article, I will walk through the main shortcomings implicit in monocular 3D pose estimation as well as solutions used by the harness to address them.
Motivation
While I have already motivated the creation of the harness at a high level, let’s review our starting point and then discuss specific shortcomings. At the end of last year, I tested out SAM3 for lifting form applications. My impression was this model was quite strong in the absence of occlusion, at the cost of requiring significantly more compute than the previous models. Naturally, the questions that emerged were:
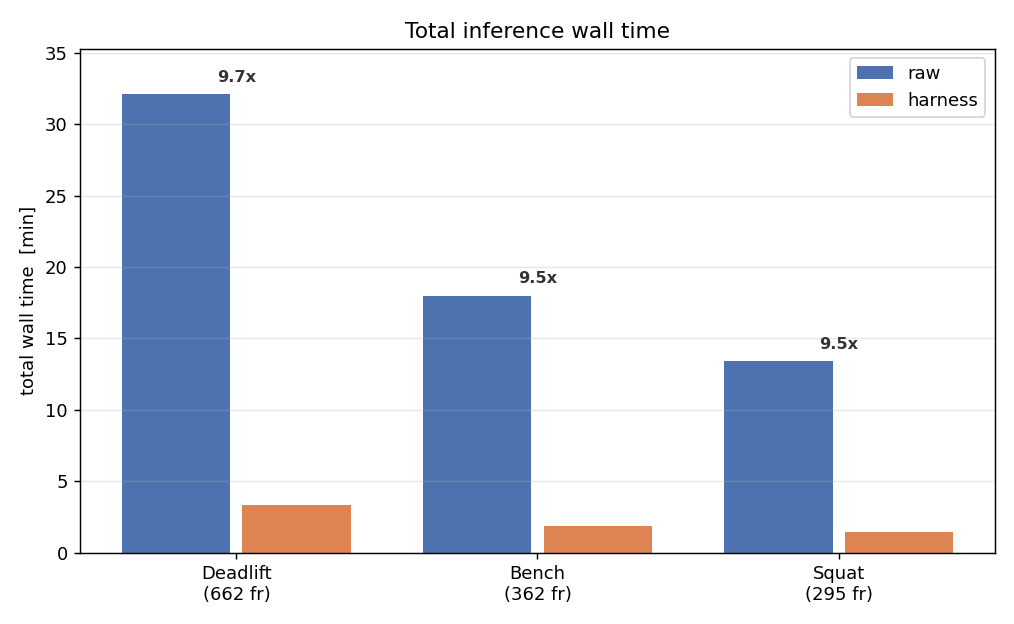
- How can we drop the inference time per video from 40 minutes to 2 minutes without adversely affecting accuracy?
- How can we extract robust keypoints during snippets with occlusion?
These are the two main goals of the harness. In particular, I will focus on covering the component tasked with improving the robustness. There are areas for improvement associated with robustness that are not unique to SAM3 but rather apply broadly to any approach using monocular 3D estimation. In this approach, we are capturing a 2D projection of 3D space into an image, and then relying on deep learning to reinflate the missing dimension. These models perform unreasonably well given this amount of information compression, but there are necessarily artifacts introduced.
Issues To Remedy
One of the main issues comes from the inability to estimate depth along the viewing ray of the camera. This becomes especially problematic when occlusion is present, and some degree of occlusion is essentially inevitable when recording a 2D video of 3D space when the subject is performing the motions we wish to analyze.
When we project a 3D point through a pinhole camera to from a 2D image, the depth mode collapses. As a result, two very different poses can produce nearly identical images. The models are generally able to resolve this ambiguity through priors learned during the training process, but there are situations when these priors are insufficient. One obvious example is during occlusion, when there is not enough visual information to determine where to place an occluded joint. For instance, if a forearm is completely occluded, it could be reconstructed to be bent back word the camera although this pose is impossible for the human skeleton.
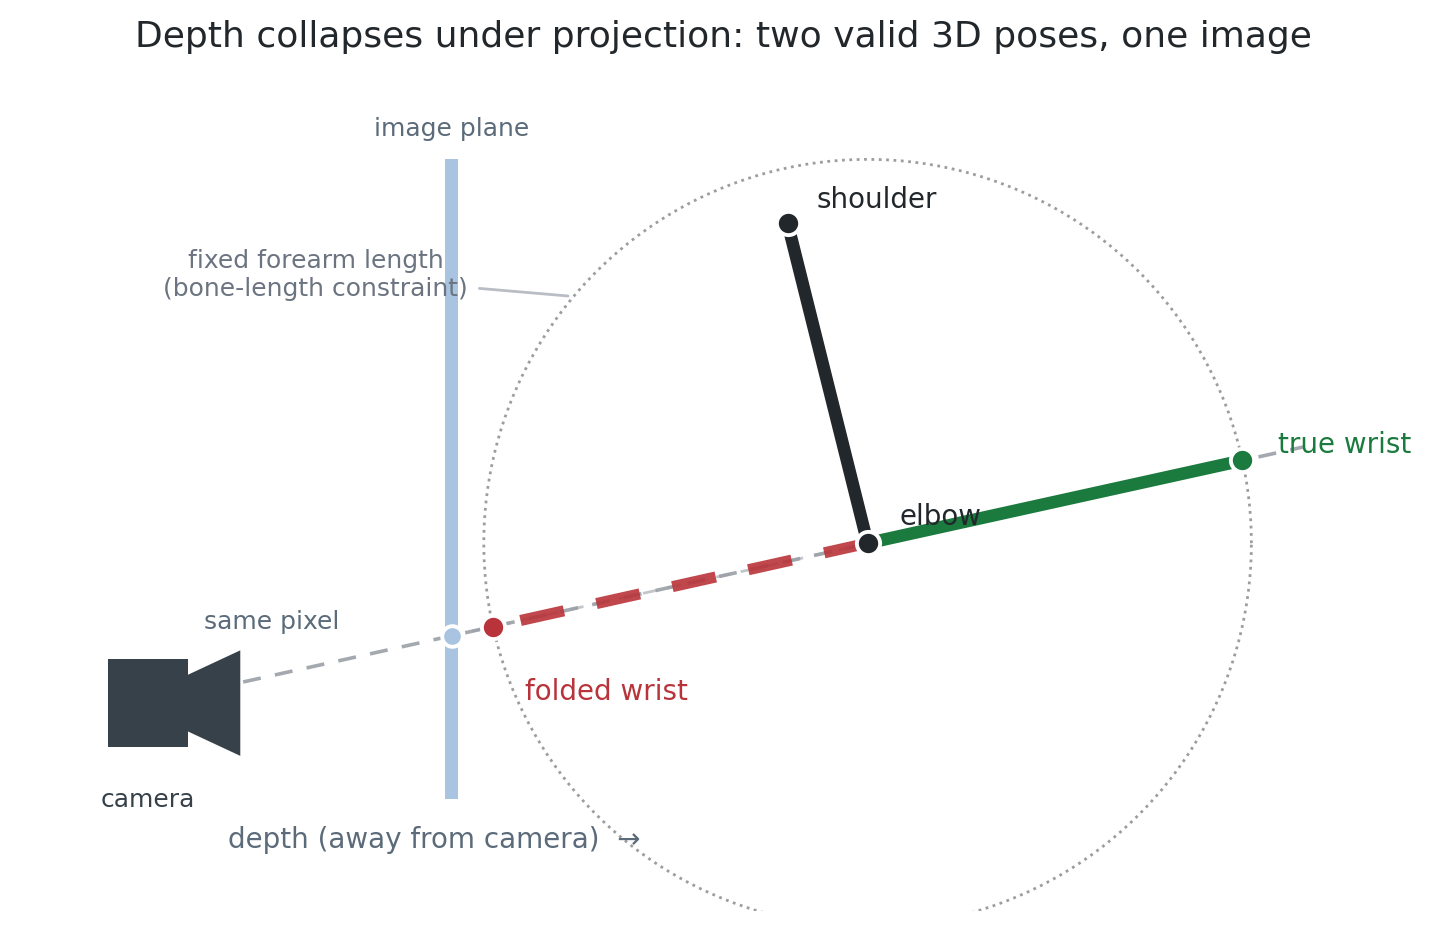
A secondary issue comes from a lack of physics integration in the estimation process. On the physical dimensions, this results in predictions that do not obey the physical constraints of the human body, such as joints at impossible depths or limbs of differing lengths. Additionally, this particular class of models does not incorporate any time information, so we cannot in general expect strong temporal coherence.
Harness Design
These two failure modes are the two main targets of improvement for the harness, which serves as a lightweight layer combining geometry, biomechanics, and accounting that sits between the raw model output and the estimated quantities. Critically, the harness should be as hands-off as possible. We largely trust the outputs of the model. Only when these outputs violate something we know to be true should the harness intervene to repair the issue.
The result is a system where the models are responsible for proposing a set of 3D positions for the relevant keypoints and the harness is responsible for validating the proposal and then re-solving against known constraints when the proposal is rejected. In general, the harness operates under three principles:
- Leverage evidence - Anchor predictions to information underutilized by the model, such as physics, biomechanics, and time.
- Gate corrections - The harness should be inert on good outputs.
- Repair surgically - Only overrule predictions on joints failing the hard constraints.
Detecting When to Intervene
Before attempting any repair, we first need to understand which joints are untrustworthy. There are several different checks that can be performed to determine if a prediction is self-consistent. Below, we discuss two such examples and help visualize these cases.
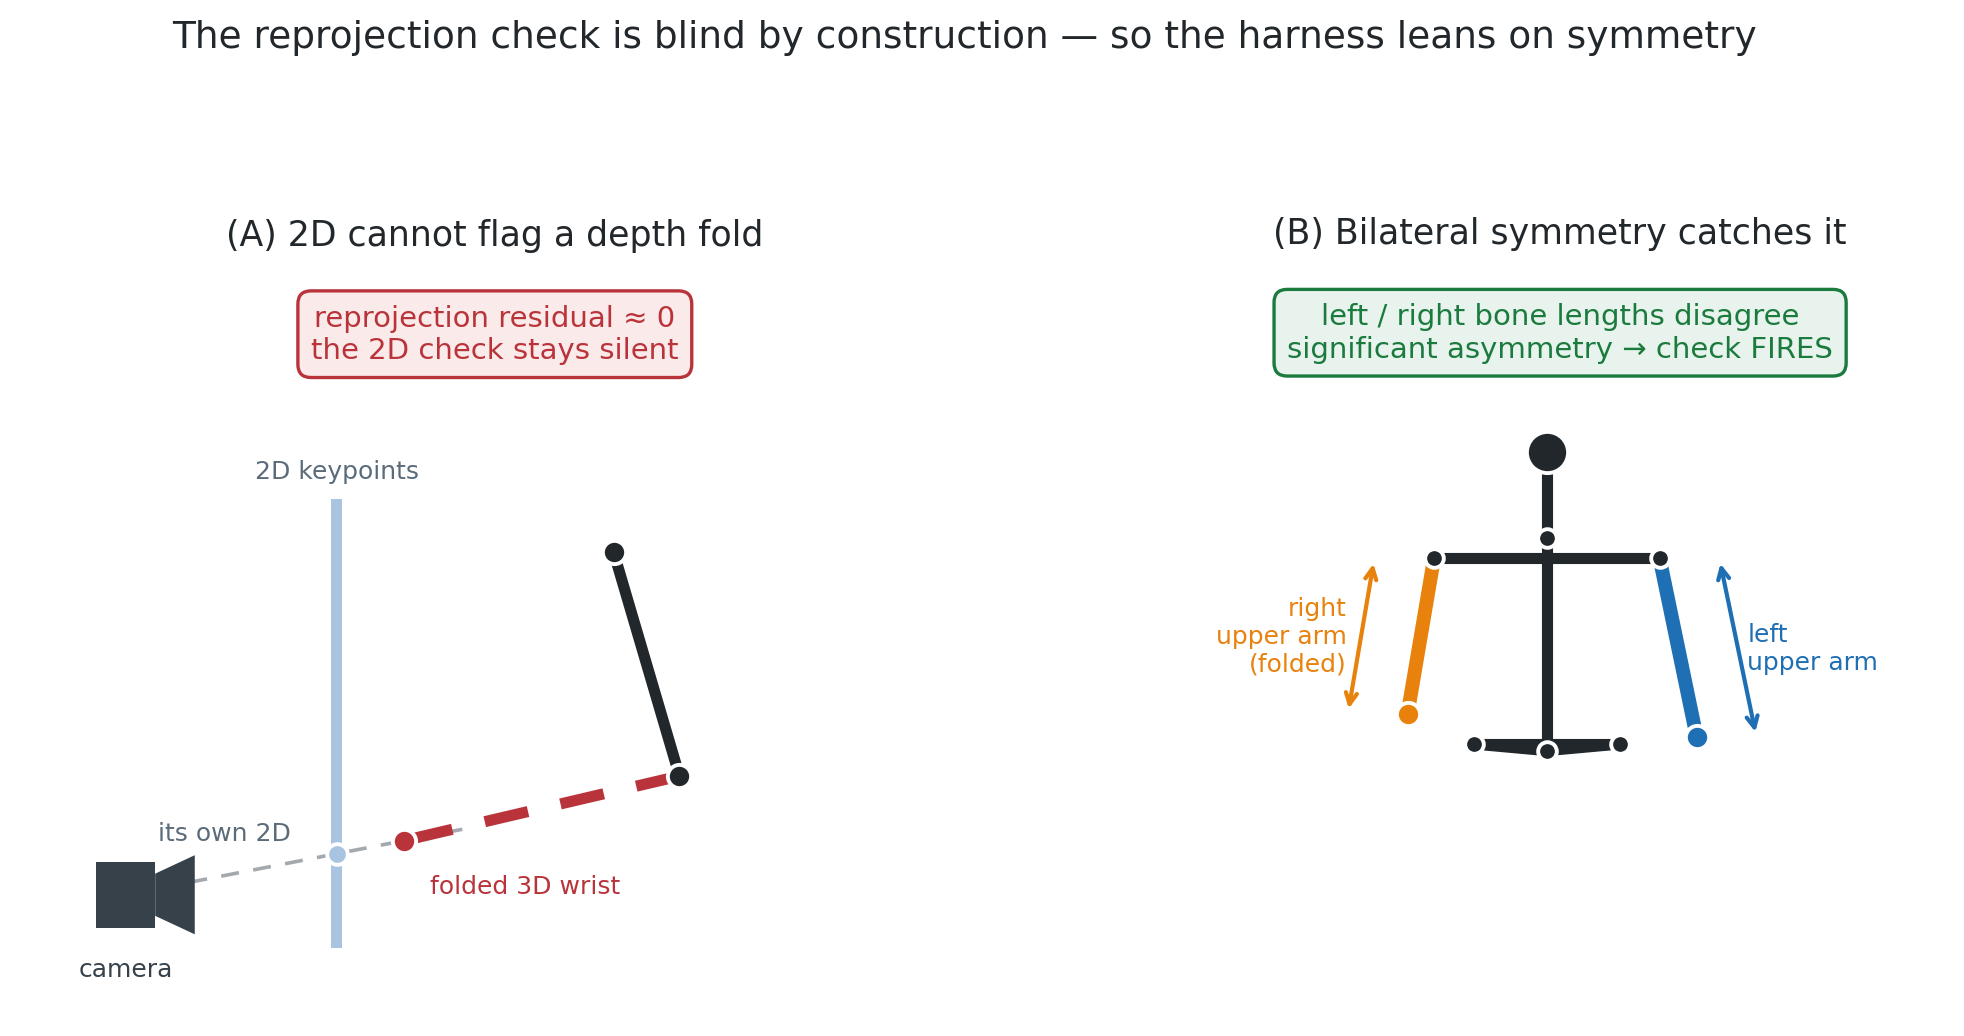
We know the image in question is formed from projecting a 3D scene into a 2D image. After we have a candidate 3D pose, we can project this back into the image plane to measure a residual between the observed pixel and the recorded pixel. This residual allows us to identify any joints whose 3D position projects far from its 2D pixel location in the image. Or put more simply, it identifies any inferred 3D coordinates that are inconsistent with the underlying image.
Another consistency condition comes from using the symmetry inherent to a standard skeleton. Imagine the case where there is an occlusion in the image preventing precise location of the elbow. If the raw output of the model would locate the elbow in a position that would imply a significant difference in the bone lengths between the obscured and fully visible arm, we know the candidate position for this elbow violates a physical constraint.
Re-Solving Depth
After our detector has flagged a limb, we need to patch its location. Since the main collapse comes from our inability to accurately estimate depth, I framed the resulting system of equations by writing the 3D position of the keypoint as a point on a known ray with a single unknown - its depth. Re-solving the system of equations produces a new value for this depth without modifying where it lands in the image, ensuring that the repair is consistent with the camera.
Continuing with the example scenario we have been exploring visually, we would assume that the shoulder is fully visible, allowing it to serve as an anchor. Along the viewing ray, so that the image is unmodified, we can then correct the location of the occluded wrist. This is illustrated in the cartoon below.
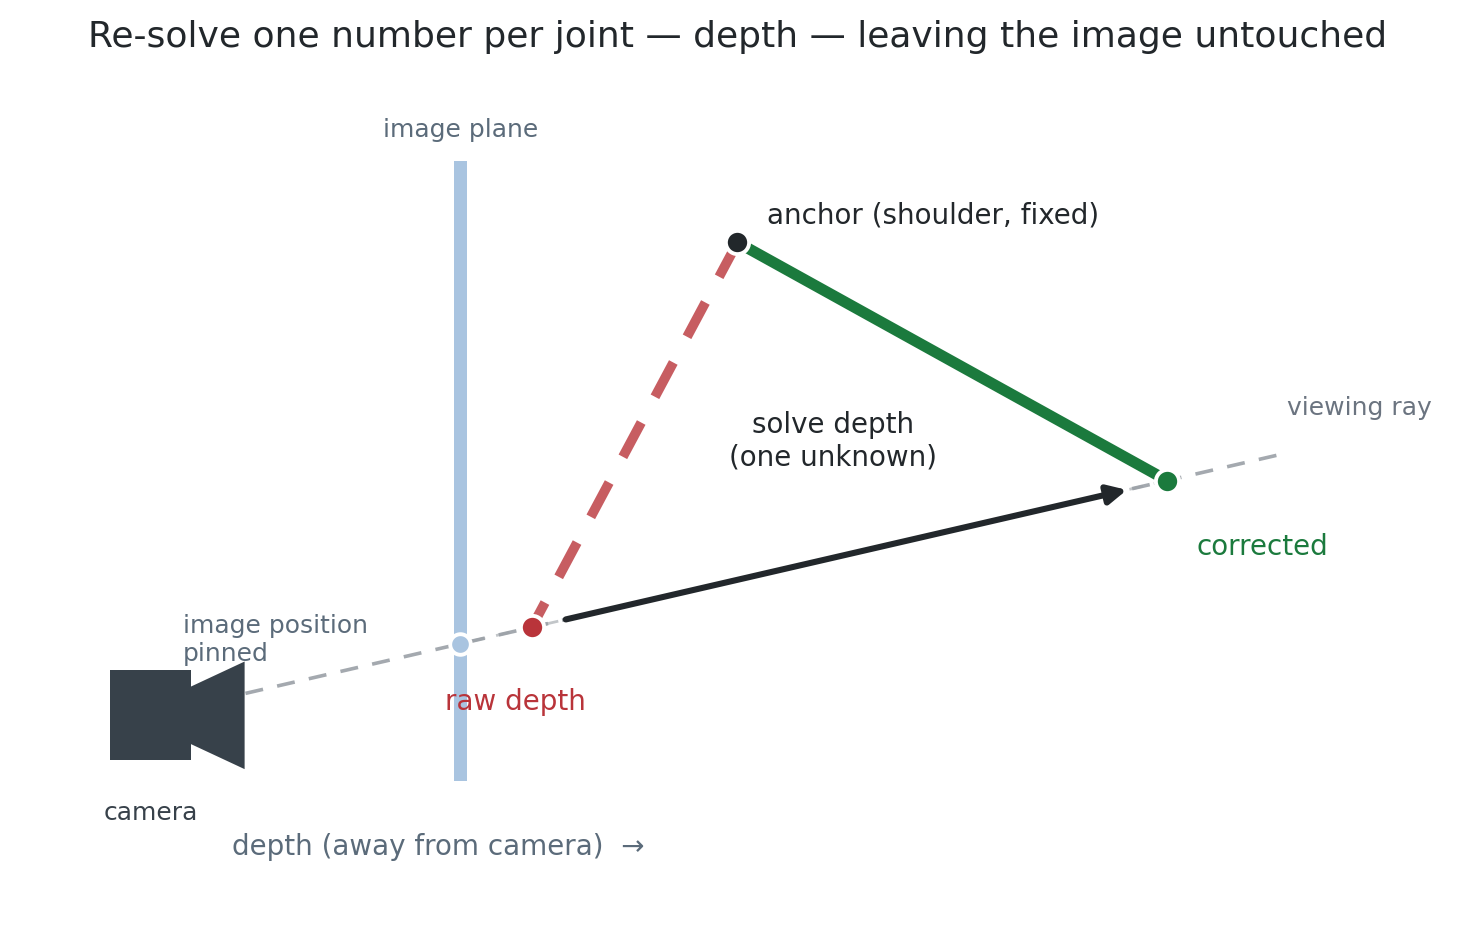
In the end, we end up writing a single objective function that combines lots of these various constraints, each of which introduces a piece of information about the underlying geometry, biomechanics, or time. Collectively, this becomes our physics model that we can solve with a simple least-squares approach to better estimate depth.
Hierarchical Modeling
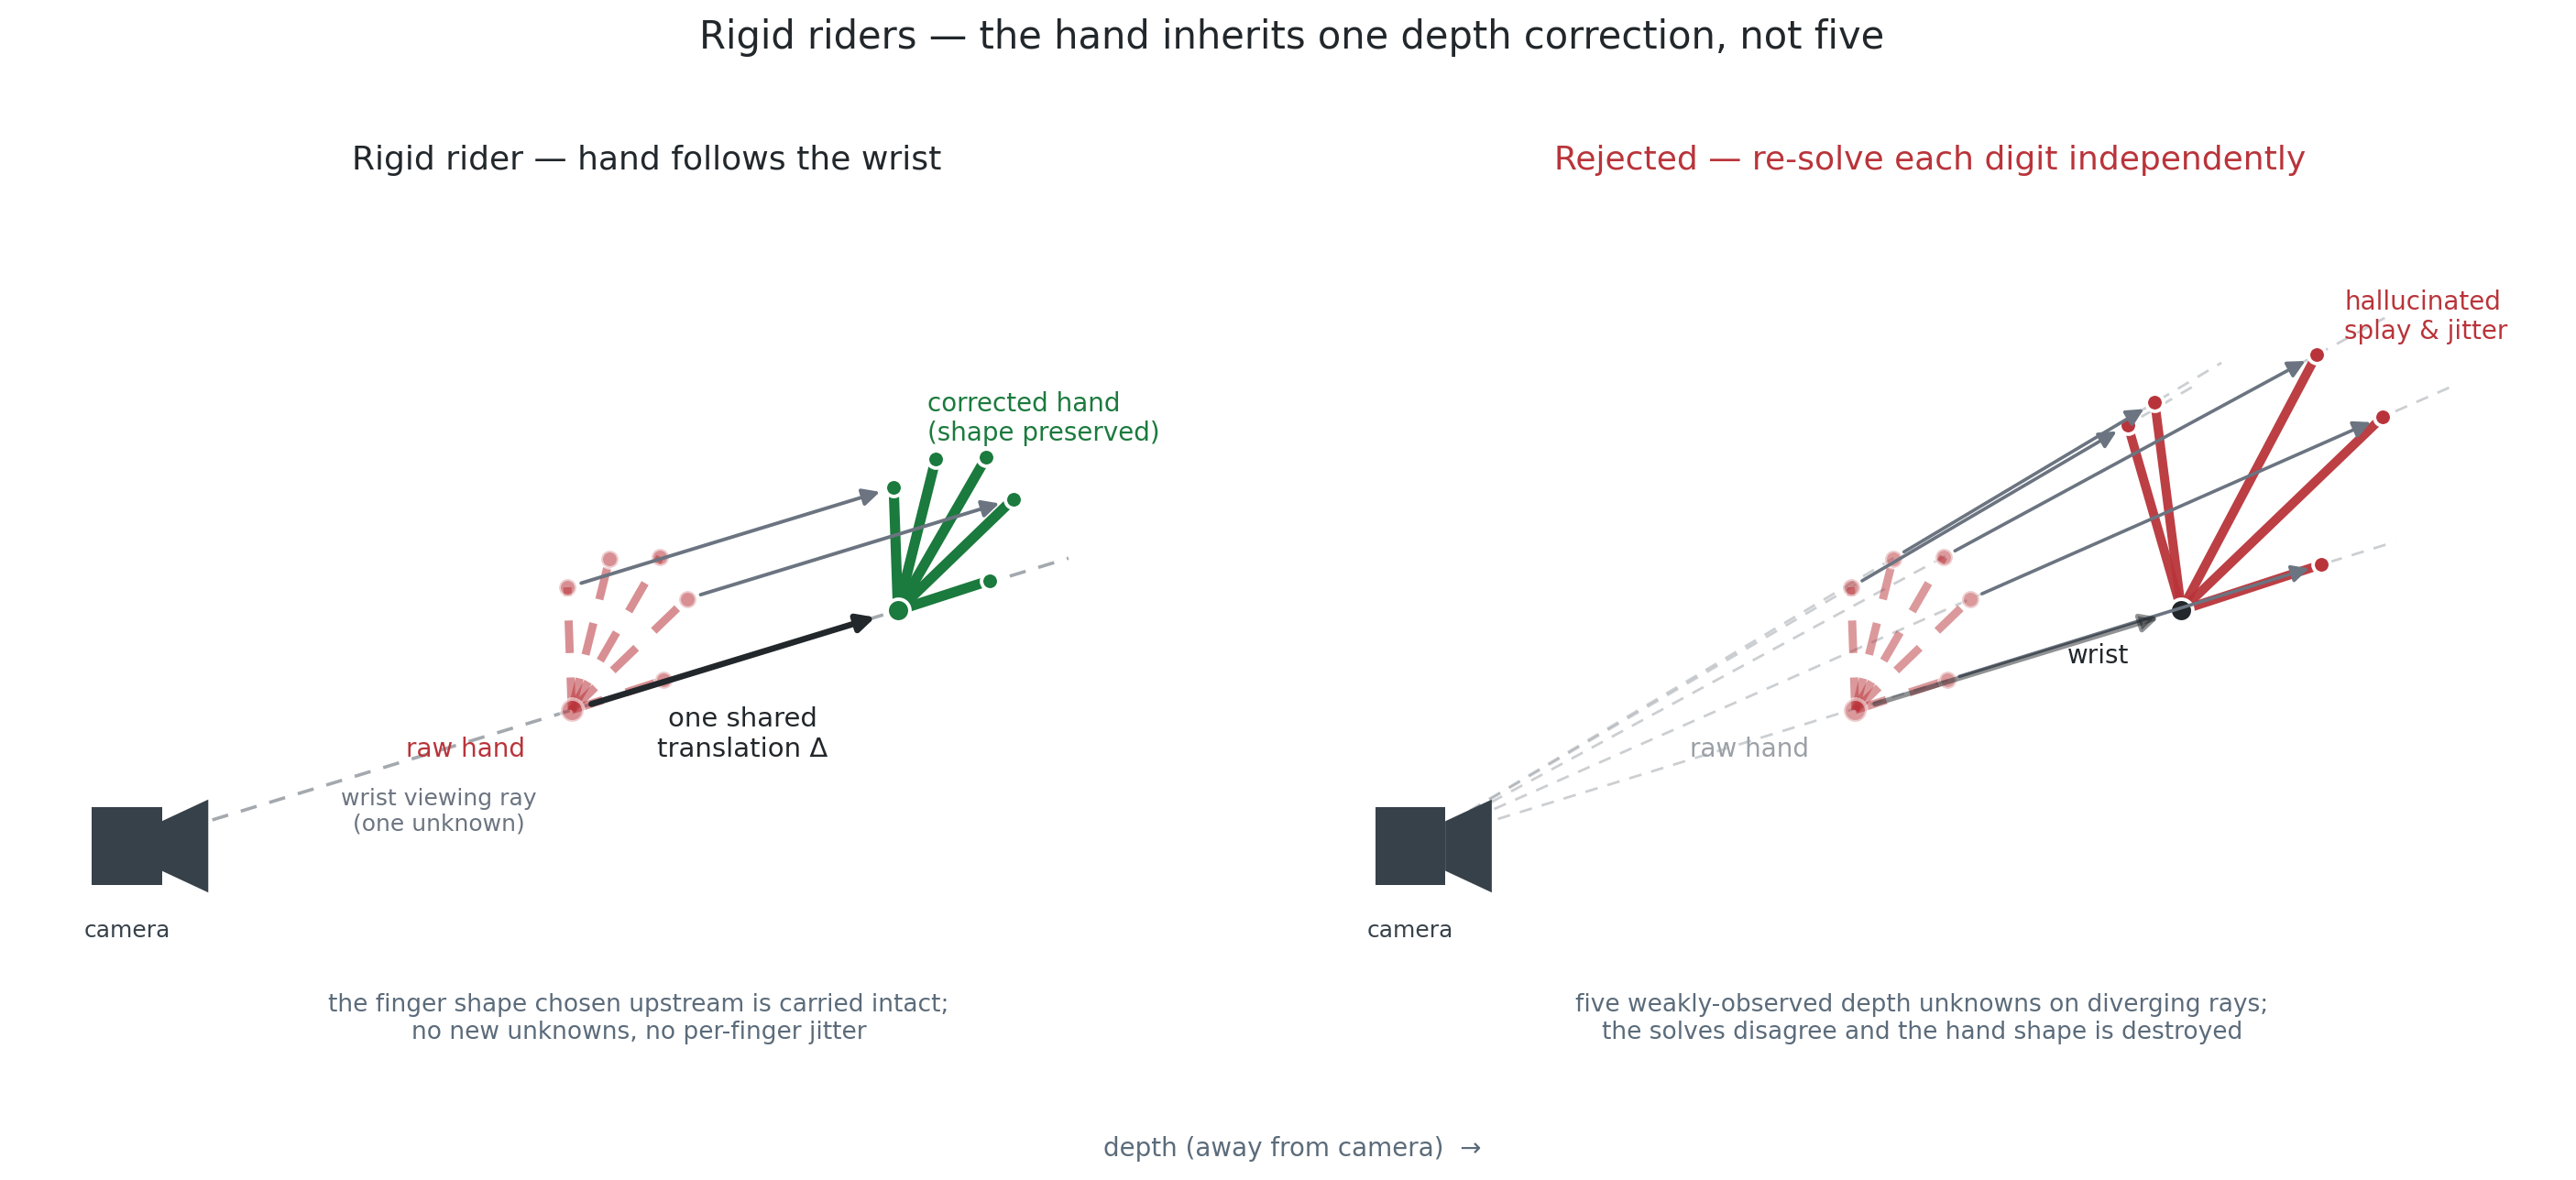
Another facet worth pointing out is that we can employ some level of hierarchy during re-solving for depth. This becomes especially important for joints that have a large number of associated keypoints, for example, the hand. If we re-solve for the location of each individual digit, for example, we would risk introducing jitter across frames or splay across digits. Instead, we can use the position of the distal wrist as the parent, and apply the same transformations that would be applied to the wrist to the entire hand.
Results
Now with the theoretical framing for the harness in place, let’s actually look at how it performs, both qualitatively as well as quantitatively. We will access its performance over sample videos recorded for a standard bench, squat, and deadlift submission. These videos represent the types of clips that are encountered in actual submissions and were not cherry-picked. In fact, they were actually selected for evaluation because they were never used during the development of the harness. I realize that reporting results on out-of-distribution data to present a fair picture of performance has gone out of style, but I guess I’m old-fashioned.
Qualitative Performance
The benefits of the harness are apparent when compared to the raw output of the model. In the videos below, the artifacts introduced from occlusion are significantly reduced by the harness.
We can also understand how the harness performs on keypoints that do not require correction. Recall that one of our major goals was that these keypoints would be unmodified by the operation of the harness. Since the occlusion artifacts are visually distracting, we can re-render the same videos as above but only plotting those keypoints that meet some confidence threshold. In the below videos, you can see that the keypoints accurately localized by the raw model match those produced from the harness. The only meaningful difference is that there are additional keypoints rendered after going through the harness due to its ability to increase the confidence in certain frames.
Quantitative Performance
Visually the harness is clearly helpful in improving the inferred 3D pose in the example videos. A proper understanding of the improvements requires first quantifying the quality of a given inferred pose. If we had a static subject in the video, we would have many trivial measures of robustness, since no deviation would be expected across any frames. However, since we expect movement in all of our videos, we need to think a bit about how to best quantify robustness.
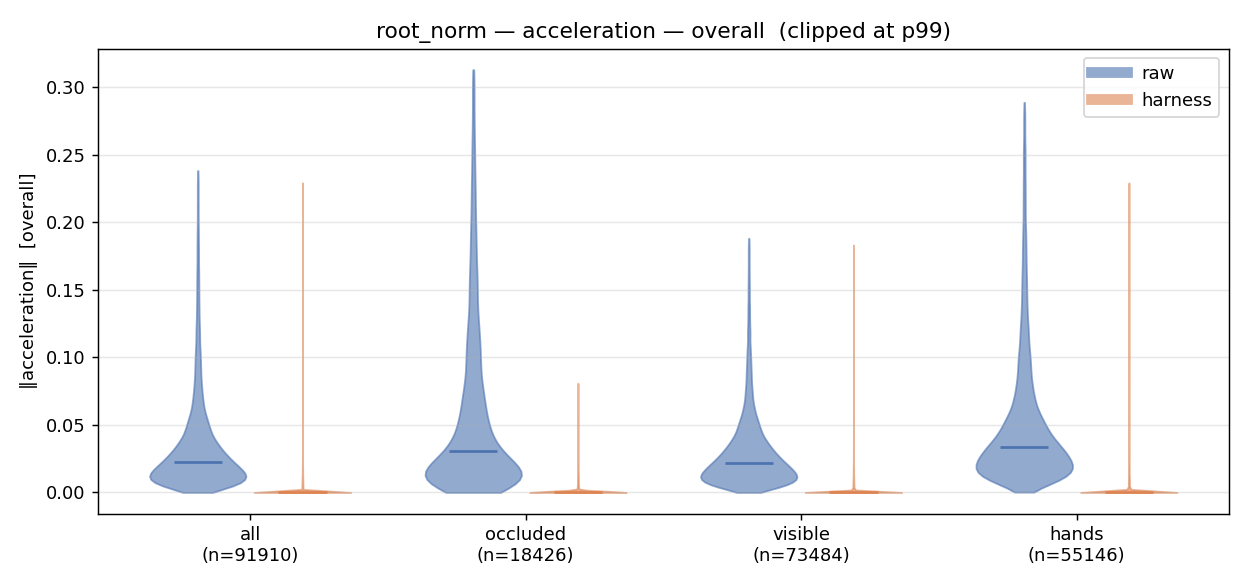
Due to the large amount of expected movement, frame-to-frame velocities is not the most informative. Distinguishing between a macro-level movement and inference noise becomes very challenging. Instead, we look at acceleration, which serves as a high-pass filter to eliminate constant-velocity motion, leaving only high-frequency movements either due to jitter in the estimated keypoints or legitimate acceleration from the lifter’s exerted forces.
I won’t go too much into the details of the coordinate system in which this jitter is measured, but at a high level we can create a metric that is invariant across different subjects and distances to allow for meaningful quantification across videos. Then, we can plot the distributions of the resulting acceleration videos for the harness and raw model outputs for several key classes of keypoints:
- All: Simply plot the magnitude of acceleration aggregated across all of the frames in our 3 sample videos.
- Occluded: Plot the acceleration magnitudes only for those joints with occlusion present.
- Visible: Plot the acceleration magnitudes only for those joints that are directly visible.
- Hands: Plot the acceleration for the keypoints associated with hands.
Inference Time
Finally, the one component of the harness that we have barely covered is related to inference time. The robustness features we have detailed actually increase the inference time, since we require additional computation to arrive at our final set of keypoints within each frame. However, we have other mechanisms to reduce the amount of compute required to process a full video. In essence, we have something akin to a physics-aware interpolation engine that is able to intelligently impute joint positions while obeying the constraints set by physics as well as the keyed frames. The end result is that we can enjoy all of the benefits in the quality observed above while performing inference almost a factor of ten faster than the raw models.
Conclusion
The development of this harness has been a lengthy yet very successful endeavor. I built out and deployed a full front and back end almost a full year ago, but I never moved past a soft launch because the quality frankly was not good enough for the application to be broadly useful. The release of the SAM3 models paired with this harness has finally removed the final quality barrier, and for the first time I think this could actually be a useful self-service application for lifting enthusiasts.
Truthfully, I don’t know exactly what my next steps are, since I never planned on creating a product when I started down this path three years ago. I suppose I’ll pester my lifting friends again to try out the latest upgrades to validate whether my belief in the quality improvement is justified. If the reviews come back positive, maybe I will finally move past a closed beta for the platform and get more people using Perfect Form to hopefully improve their training.